Wednesday, December 23, 2009

Israel: An exploration of people, culture, and conflict


I am not about to write a political piece and while yes, I do have strong opinions, this is more about a photographic approach to documenting a country that I have personal ties.

When I went to Israel this summer, I packed 4 cameras: a digital Nikon D300, Zenza Bronica Medium format film camera, an auto-focus film Nikon SLR, and a Yashica TLR Medium format film camera. In the end, I ended up using the medium format cameras the most because they were light and the Yashica was particularly quiet and unsuspecting. With film cameras, I make each photo count and when I got my film returned to me after development, I was thoroughly please with the shots I made.

Lesson: Bring at most two cameras - one if possible. It's awful to have to carry a bag around if you don't have to!

My goal was to capture the heart of the country. In order to capture the heart of the country, I needed to capture those every day moments of normalcy. As a tourist, it's not an easy thing to distinguish between what's normal interaction and what false interaction. The citizens respond differently when they're walking up and down the street than when you are at a merchant's store. Living in one neighborhood allowed me to really get a feel for the area and the people who constitute it. I knew what was happening and when - as if it were my neighborhood back home.

Lesson: If you want to capture who someone really is, you might just have to get to know them.

Capturing the well-known pictures of the Islamic dome in Jerusalem wouldn't have done this project justice. If I am only showing you what you have already seen, then I am not contributing to expanding your perspectives. I know I needed people to see just what a normal country is so that when you look at my book, you can "Hmm... this reminds me of where I live or place I know."

Lesson: Contribute - show a side that usually isn't seen.

Saturday, September 26, 2009

Take only the Best: Show only the Best


Take only the Best: Show only the Best

Someone was remarked, "All the photos you take are really wonderful!" Really, are all the photos I take really that great? I doubt it - No, I know that not all of them are that great; however, I am not bashing this person. I want to bring up a certain point - if you want to look good, there are several tips to follow:

1. Take only the best photos

2. Show only the best photos
3. Dump the rest.


Take only the best photos:

When you shoot, be critical of what you shoot. Some shots just weren't meant to be. When you do not need to shoot a ton of photos, it is best not to set your camera to multiple photo shooting. For several reasons:

1. It will be a pain and time consuming to go through all of them
2. Your card fills up faster (if you're using digital)
3. Your efforts will be hit and miss - you're "praying and spraying"

Instead of firing off a ton of photos, ask yourself a few questions:

1. Does this shot honestly serve my purposes?
2. Could this shot be even better within reason of the circumstances?
3. What other angles can I explore?
4. How is the lighting? What can I do to maximize the lighting?
5. Whatever else you can think of....

A well thought out photo tends to be a better photo and sometimes spontaneity can be great - being ready just allows you to capture that moment much better.

Show only the best photos:

If there is a hard lesson to learn, it is that people really, honestly don't care to look at all of your or my photos. Honestly, I do not want to see every single photo you took. I want to see your best because they will give me a greater impression. This is harsh, but once you've mastered weeding out the not so good photos, your audience will praise you more and appreciate your work a lot more.

If I shoot 100 photos in a session which is normal (75-150), then I will choose about the 20-30 top photos. Most of the photos will get between a 3-4 star rating out of 5, but the Fives are the ones that go beyond just nice and into the realm of "awesome" or something that invokes an audible sign of satisfaction. Art can be a private thing, but if you are showing people, you are
showing your work to impress/give an impression - in this case, less really is more.

Dump the rest. Seriously.

Dump the rest... seriously. There honestly is no time to look at work that didn't make the cut. Save one or two for nostalgia or something, but the best thing you can do is de-clutter your computer with photos you never look at. I have thousands and thousands of photos - I honestly don't have the time to go through them, that's why I post up my favorite 5-7 photos from each shoot. Doing it this way relieves me from the effort of worrying about the old ones. It might be hard at first to dump your beloved memories, but after a while you will feel the weight lifted off of you and your hard drive will thank you many time over.

Thursday, August 20, 2009

The Things I Learned From My Trip To Israel


Don’t carry a ton of equipment:

I brought 4 cameras this trip – A Nikon D300 digital SLR, a film Nikon SLR, a Yashica 635 (medium format twin lens reflex), a Bronica SQ-A (medium format SLR) with a whole host of lenses. And which did I use the most? I used the Yashica, 50% of the time, the D300 40% of the time, and the Bronica the remaining 10%. I didn’t use the other Nikon at all. I liked the Yashica the most because of its quiet operation allowing me to take candid photos. Because many people in Israel had never seen a twin lens camera, a lot of curious people would stop me to ask me “Hamatzlama adayin ovedet?” (The camera still works?) And I replied, “Of course… I don’t have it with me for nothing!” Just wearing the camera made my subjects come to me of which most were friendly people. The ordinary camera made me look like a normal tourist – so when I want to get willing subjects, I just don my old 1960s Yashica and go to the street. If you have an old, unique camera, fire it up and take it for a spin – you’ll draw attention giving you the perfect chance to interact with people.

Use one lens if you can help it:

One beautiful thing about my Yashica is that there are essentially no accessories, so I never need to worry about buying another lens! Today, we’re all looking forward to buying the next lens and getting the next latest gizmo for our iPods and iPhones. So to have a device which is an all-in-one package that is entirely mechanical saves me the trouble and worry of having to thinking about how many batteries to bring along, which lenses to bring, etc.
However, the Nikon was not so simple. I brought several lenses: 50mm 1.8, 80-200 2.8, 18-70mm 3.5-4.5, and 35-70mm 2.8 Nikkor lenses. In the end, the 18-70mm Nikkor proved to be the lens I used the most because of its zoom range and faster than usual aperture. It’s really just a royal pain to have to carry around one bag or shove a lens into a pants’ pocket in the situation I might need it. To save my sanity, I just brought a versatile lens that did 85%-90% of what my other lenses could do. I didn’t have quite the fast aperture for low light situations, but if I really needed, I could boost my ISO. After all, the subject matters more than some grain in the image. The 80-200mm lens would draw too much attention to me and was rather unwieldy to carry around all day. The 50mm was great for low light, but what if I wanted to get close? Forget it. So for the zoon range, the lightweight, and relatively quicker aperture the 18-70mm was the lens of choice. In the end, having only one lens allowed me to concentrate on my photography without wasting time and energy carrying and changing lenses.

Shoot with a purpose:
My goal as a photographer was document Israel and portray it the way I saw it – as a normal every day country where people live mostly as we Americans live. Having a vision guided me. I learned a verse from the Proverbs that goes beyond religious boundaries; "Without a vision, a nation will perish." Have a vision and move forward.

Tuesday, July 28, 2009

Making the Most of What You Have


Most of us can admit that we all want that new something. Whether it's a new camera or lens, we are all looking forward to getting something new. Take some time to reflect and ask yourself, "How much is too much and when will I ever be satisfied?" I have personally experienced the feeling of wanting the next and best. My parents would always ask me, "Will this finally satisfy you?" and I'd always reply "yes", but it was never enough. Years later, I have finally come to realize when enough is enough.

So what is the connection to photography? Be satisfied because rarely it's our equipment that prohibits us from creating great photography. I brought 4 cameras to Israel because I might need them all, but I've really only used two of those cameras extensively - my D300 and my Yashica 635 twin reflex medium format film camera. I love the Yashica because it only has one lens. I don't have to worry about what if I had a different lens because there is only one. It's liberating to have that 80mm lens (50mm lens on 35mm film) because I can just focus on what I do have instead of what I don't have and all the wonderful photos I could be making with the lens I don't have. I brought 4 lenses for my Nikon D300, but yet the 18-70mm Nikkor lens is what I use 90-95% of the time because it's just so flexible.

Plenty of people question as to what to bring, but my philosophy now is to just bring your favorite lens and don't look back. Not only will you save time and energy not having to carry everything and keep track of it, you'll always protect yourself from going mentally insane and stressing. A few days ago on the beach, I did something very liberating - I set the camera to automatic (P mode) and just shot... the shots came out just fine. So just grab your one camera with your favorite lens, go out and explore, and have a good time. Focus on creating, not overloading.

Monday, July 20, 2009

Learning to See Light and Textures

Light and Texture

One way to become good at photography, is to learn how to see light and texture. I shoot black and white film and sometimes digitally to hone in my ability to see light and texture. The reason for which I use black and white is because I find color distracting - it's another element and it's easier to concentrate when you have less elements. Even when I work on color images in Adobe Lightroom, I first convert to black and white, work on the tones and contrast, then convert it back to color. Doing it this way allows me to ensure that the lighting within the photo is good. Color just distracts my eyes and I just see better in black and white.

Black and white is also a distortion of life. It again just boils everything to the bone - light and texture. I'm not telling you to shoot only in black and white, I'm asking you to get out and try new things. Photography concerns itself with lighting and as photographers, we too must concern ourselves with lighting.

Returning to the idea of boiling things down, black and white really has forced me to look harder at composition and textures within a photo. I also come to understand the limits of my digital camera in that I can't capture all the variations in the lighting in the scene. When I view black and work, I find myself forced to look at the essence of the subject.

Friday, July 17, 2009

4 Ways to Improve Your Photos

4 Ways to Improve Your Photos:

I've been in Israel and with a little time to kill, I went outside into the neighborhood to find photo opportunities. If you think your area is boring, think again! Here are 4 tips to help get your creative juices flowing.

Expore your angles!
Check out those shadows!
Find those colors!
.... Play with the light!

Explore your angles:
You're going to sometimes get high or low...There are times you're going to have to put in some effort to find those angles, but it'll well worth it!

In this photo, I had to get low to the ground to capture this image. I used an 18mm lens on my Nikon D300 to distort the image. As your eye scans the image, it leads from the man crossing the street to the in focus ground. When you shoot, shoot with purpose and you want to convince the viewer that there is some logic in your photo.

It was evening, so I had to use a higher ISO, but for digital users, don't free about high noise... just capture the image. Subject matter is more important than being very sharp or slightly noisy.

Check out those shadows:
Using shadows conveys a different outlook on reality. Shadows are distorted shapes based off real objects.

I loved the warm tone here given by the sun and the shadow really jumped out. I like the contrast as well. For me, there remains some mystery in the shadows! Really, shadows and reflections are akin in that they both represent a distorted reality of things that are. The Greek philosophers believed that what we see are shadows of what really exists. So what or whom do the shadows really represent?

Find out those colors:
Colors just draw the eyes in... especially bright, vivid, primary colors.

The red and the green just pop out! The reflections also contain some "hidden" details if you should look harder. I like to make the viewer dig deeper and deeper into a photo. It remind me of the Dutch painting at the Toledo Museum of Art whereas a kid, the art teacher pointed out a man off to the side relieving himself at a tree. The details are important as well.

You probably have an eye for looks good and what does not color-wise. Color can be found everywhere and contrasting and complimenting colors can be both used with intention.

Play with the light:
Mix shadows, reflections, different types of lighting, etc. This helps to make your photos look dynamic.

I just felt something about the warm colors and the bright, golden light being thrown off from the evening sun. You'll notice that most of these have been done with wide angle. I usually don't use wide angle for head shots, but for scenes, I like to squeeze everything in.


Hopefully you can make use of the tips in various situations to improve your photos. One important thing I've learned is to NOT bring many lenses. I've been using mainly my 18-70mm Nikkor lens. I've only used my 50mm 1.8 once this entire week.

Wednesday, July 1, 2009

Use a Prop to Spice Up a Photo

Use a Prop!

One of the best ways to get a good portrait is to make sure that the person who you are shooting feels comfortable. Many amateurs and people new to photography try to make their subjects comfortable, but find it difficult. This article seeks to assist them in this process.

For several months, I shot almost exclusively indoors with a white backdrop before transitioning back to the outdoors. During those months, I finally understood that people tend not to know what to do with their hands, and that props were necessary to give them more confidence.

When I shoot senior portraits, I ask the seniors to bring some props that reflect their personalities. One girl brought her art accessories which enhanced the photos by incorporating her personality into the photos. Not only did the props enhance the photos, but they also made her more comfortable, and she knew where to position her hands. I don't think her session would have been anywhere as fun nor as productive if she had not brought those props.

Combining excellent lighting with great props, the results were likewise excellent. It is equally important to justify the elements within the composition. A prop should not look out of place - it should work to compliment the rest of the photo.

Not only are the notepad and pencil props, but the background is a prop that enhances the photo by giving it visual interest. The rustic look of the train interior with the side lighting all lend to an even, balanced composition. Again, this is art and it is subjective, but there should be a justification for the elements within the composition.

When we did our trip to Kellys Island near Cedar Point Amusement Park in Sandusky, Ohio, we stopped at an ice cream store before leaving back to the mainland. There was a restaurant with a beautiful brick wall which I thought went well with her outfit and the ice cream topped it off. Sure I could have just had her pose strictly with her arms, but I felt the ice cream would add something different.

Tuesday, June 30, 2009

Go Natural Light: It's Cheap...but Good

Go Natural Light: It's Cheap...but Good

Do you want good results without having to spend a lot of money? Go all natural light - it's cheap... but good!

I own regular Nikon flashes as well as Norman monolight studio flashes, but what I have found out is that I don't need any of those to get great lighting on my subjects. There are two main reasons why I do not use studio flashes regularly: I am lazy and I do not have a mobile power source.

So where do we start? First we need to understand that there are different types of lighting. There are two types that I am interested in: harsh and soft lighting.

*Harsh lighting is concentrated as opposed to an even, spread soft lighting. Harsh lighting occurs towards the noon hour when the sun is directly overhead and soft lighting occurs more towards the early morning and late afternoon as well as cloudy, overcast days.

You want to try to avoid mixed lighting - the kind of dappled lighting you get from being under a tree because the leaves allow some light to enter and some light not. The best place to find even light when it's not early or late or an overcast day is to go to a place where there is soft shade. When I say "soft shade", I mean to say shade that is not dense. You can find such places where a building casts a shadow, but not the kind of darkness found in a closet. For the most part, you will need to search out the places and they will change through out the day, so pay attention.

For the photo to the right (for people whose screen does not have the images set to the side, the girl with the firefighter suit), there was an overhanging that provided some soft light/shade that was perfect and the light coming into the area acted as a main light (the main source of light). The light coming into the shaded area helps to give her a sort of glow.

In order to find this, I had to search the area that had this kind of lighting. If you wanted to have great locations, you will almost always have to search them out. Sometimes they are in obvious spots and other times, you'll really have to search hard. Thus in a wrap: You will have to scout locations, but you'll get better shots!

Do you want those big, beautiful eyes to really shine?

The best well to show off someone's eyes is to place them in front of window and their eyes will just light up with amazing catch lights - works every time! The light from a window, and depending of the window, tends to give punchy lighting. Perhaps the something like you can get from a silver reflector or a costly soft box. The larger the window the better because a large light source will wrap around the subject producing soft lighting; thus larger windows are better for fuller length shots. By the same reasoning, an on board flash included on most cameras is too small for much off anything and its catch light is akin to small dot of light.

In a wrap: you need to search for quality light. Sometimes it will be easy to find and other times, you'll really have to search for it, but thus is the life of a photographer.

Sunday, May 10, 2009

Digital Waste and Film Savings!


Digital Waste and Film Savings!
:
Let's get real with each other and clear up the misconceptions and discover the true benefits of film versus digital and how each has its own place in the art of photography.

I have thousands of dollars worth of equipment I've collected over the past 3 years, I've finally come to understand some critical realizations I will be sharing.

Everything has its place: film and digital cameras are no exception.

Can each produce beautiful results? Yes.
Film and digital are each capable of producing high quality images. The key to beautiful results lies with the photographer - rarely if ever with the camera. "A cheap" camera is never a valid excuse for not making beautiful photos. Pro cameras tend to have a more complicated features and more durable bodies, but almost every camera allows for manual control settings, thus creative venture is now in the hands of the photographer. Let's never let the camera stores and companies make us believe that we must have the newest camera to make beautiful images.

Artists never just have one pencil or brush; likewise, a photographer has more than camera for the specific job. Not all photographers have more than one camera, but quite a few day.

Are both easy to use? Yes and No.
There's only one instant camera - that's Polaroid. Everything else, sorry, is not instant. Film and digital have their own distinct advantages.

Digital pluses: Digital gets the picture to you quite quickly and you can see how the photo came out immediately. You have the option to shoot as much as you want and erase as you want. Working with the photos is simplified from film because you don't have to scan the negative... it's digitized already.

Digital minuses: Archival can be hard - you have to be careful of hard drive and storage failures. You can take more photos and when going back, there will be hundreds and even thousands of photos to search through - time consuming. In the future, there's no guarantees you'll have software to work with old RAW files. You need to have a well calibrated monitor to see the photos properly. Digital cameras tend to cost more than film cameras and have shorter life spans.

Film pluses: A negative can yield high resolution digital images. You enjoy the old fashion way of making prints ;) You shoot less, make each photo count, and get overall winners... that's what's life is about, right? You want to get photos that you enjoy, not out takes. Archiving film, you don't have to worry about your negatives crashing or being too obsolete to use. Your film camera will outlast your digital by many years, even decades. One of the largest bonuses is that you can miss the exposure and still get a good image. So if you should have shot at 1/125 instead of 1/250, film is forgiving. Of course, getting the exposure is always best.

Film minuses: Not as good for situations where you need the image as soon as possible - an element of patience is required. If you scan film, this can be an extra step in the work flow. Film is not used as much as it was in the past and fewer labs are supporting medium and large format films.

The Film Investment and the Digital Loss:
It took me about 2 years to realize what I'm about to tell you: Film is awesome.

For everyone that might not be true, but for me and my purposes, it certainly is. I bought my first camera in 2006 for my trip to Turkey. At $600, the Canon 20D seemed like quite an investment at the time and before I bought it, I felt I'd be barely fortunate if I could buy a camera for $400. As you'll hear, digital is leading the way - or is it? I enjoy how I see my photos instantly as I take, so I can check to see if I got the exposure and if I got the details correct as well. The digital camera is by far a great tool for beginners. I still use digital for business uses, but beyond that, the digital camera stays in the closet.

Anything I feel is important, I run to grab my film camera because film isn't going anywhere and don't let anyone convince you otherwise. Film has been here for over a hundred years , and while the support is waning, it certainly has a strong following. So we can all be rest assured that we'll be able to have our negatives printed in the years to come.

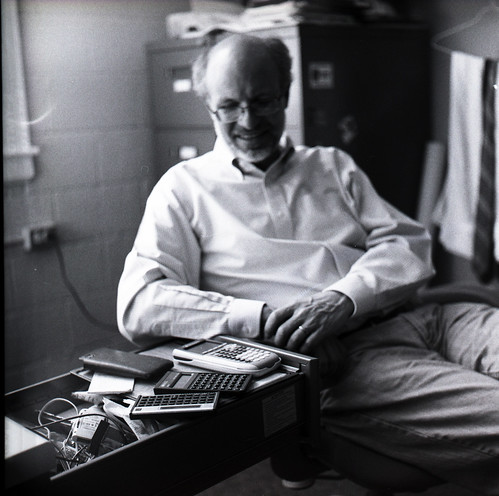
Film exposure is forgiving: you can miss a stop or two, you'll still be fine. The right exposure is the best exposure, but it gives peace of mind that I can still get a great image in the darkroom from an image that was a little underexposed or overexposed. From my experience, digital hasn't given me this ability to the extent film has. The photo of my friend shows an image that was overexposed several stops. I was still able to recover a good deal from it!

The camera I shot Gus with is a Yashica 635 from the 1960s that was mint condition for $180 with a light meter. I don't even use my digital camera from 4 years ago, but this camera keeps on shooting. Not only that, but because of its leaf shutter, the Yashica is extremely quiet and doesn't vibrate allowing me to shoot at much lower speeds without blurring. The film runs $3.60 for 12 frames of black and white, and this comes out to about 30¢ per image... that's very little considering film users make every image count especially if you're cheap (I prefer "frugal") like myself.

I love both mediums - I just prefer film for personal use and digital for the clients. It's America and people live life in the fast lane. In every day words, that means photographers need to deliver on demand. When I fulfill my passions, you won't see my lugging around a huge setup, rather you'll see me with my sleek little Yashica photographing the important aspects of my life.

Tuesday, May 5, 2009

Shooting with a Passion


Shooting with a Passion:

Photography for me is a means of an expression and is a passion. What is a passion?

The dictionary says a "Boundless enthusiasm."

Nowadays, there are so many people shooting that lack that boundless enthusiasm. There are too many people wasting precious time over such irrelevant details as technical specifications when they should be thinking of the next self assignment or producing something beautiful.

I have come to realize something: lens and camera are much less important compared to the person behind the camera. Too much time goes into changing lenses and worrying about which one to carry for that day. My typical 35mm film outfit is simply an old school Nikon and a metal 28mm lens - this probably accounts for 90-95% of my needs for that format. For medium format film cameras, the Yashica 635 is a fixed lens at the equivalent of 50mm on 35mm film or a normal perspective lens. As to my digital outfit, I used a D300 , 80-200mm 2.8 Nikkor lens, and a 50mm 1.8 Nikkors lens. I just simply think more than 2 lenses is overkill - 1 is preferable of course.

Once I have the camera outfit ready, I concentrate on just finding interesting subjects to shoot. The camera is just an instrument; the rest must be done by me.

Monday, May 4, 2009

Environmental Portrait Project


Environmental Portrait Project:

Photography for me is a passion and occasionally, I like to assign myself an assignment to push my creativity and give myself direction.

Going back to my winter vacation in Israel, I made it my goal to exercise my Hebrew and speak with people on the train. Out of that grew a similar goal in the US to speak with the person next to me on the train. Hey, I'm going to be sitting next to that person for 2 good hours, so why not take some time and learn about them? Through this, I've met quite a few interesting people.

If I'm meeting people all the time on the train and I may never seen them again, but why not find out more about my classmates at the university. So my self assignment was thus born; I would go out and photography people in their environment being themselves. I have learned that people have this irrational fear of cameras and I still haven't figured out why. Some people, it's taken some more time to convince, but gradually, more and more people became interested in the project.

I've also looked to using old fashion methods of photographing instead of using digital cameras. I feel this helps me get back to the beauty of photography. It takes about 45 minutes to develop the film negatives and each 7'' by 7'' print takes about 25-30 minutes from start to finish. It's surprising for me how fast the times passes as I am in the darkroom exposing the paper, running it through the chemical baths, then taking it out into the light to see its full glory. I love the toned that I get from black and white film and developing. I've also come to realize that film won't be perfect and to love it even more than despite its imperfections. There will also be some dust - or at least for me it always will... for now.

I love the interaction with people that photography provides me. That reason in of itself is one of the main reasons why I do photography. I can't imagine doing something where I don't interact with others. So taking time to learn about people on the street and about who they are is an extremely rewarding experience. The man to the right, I met him in downtown Toledo where a new sports arena is being constructed. I took a few minutes and asked him about the arena, then I took some time to ask him more personal questions about his work and why he started into construction. After some time, I felt he was comfortable, and he agreed to let me photograph him. I also met some people at Jimmy John's right around the corner. They were more than happy to be photographed. I usually go to Jimmy John's when I'm in Toledo on the weekends, so they know my face.

I am still continuing the project and I feel it is becoming an overall theme for my work. I have always felt that a plain background is nice, but isn't even better if we can see a photo that shows a bit of who the person is? How often is that we pass people all the time without thinking who they are or the kind of interesting people they might be? As people photographers, it's necessary that we have good people skills, and at times, that might mean stepping out of comfort zones. Even if you're not a photographer and reading this, it might be well worth your time to try and meet some new people.